[Node.js] Express 프레임워크 + MySQL 연동해서 RESTful API 서버 구축 방법 (샘플 데이터로 CRUD HTTP Request 테스트까지)
딱지의겨울
·2021. 7. 18. 13:01
👾 개요
Node.js의 Express 프레임 워크로 MySQL에 연동해서 서버를 구축해서 사용해 본 경험이 있는데 복습할 겸 간단하게 다시 구축해봤다. model, controller, routes로 구조화해서 설계해서 이전에 사용했던 것보다 구조가 복잡하긴 했다. (예전에 했을땐 app.js에 다 때려넣었다.. ㅎ) CRUD를 실행할 route를 정의한 후, RESTful API가 정상 작동하는지 테스트를 하기 위해 postman을 설치해서 테스트해봤다.
구축 방법은 다음과 같다.
1. Express 웹 서버 실행.
2. MySQL 데이터베이스 Configuration 추가.
3. 'Customer'라는 샘플 모델 생성 후 컨트롤러 작성.
4. CRUD 작업을 처리하기 위한 routes를 정의:
| Methods | Urls | Actions |
| GET | /customers | 모든 Customers 조회 |
| GET | /customers/:id | id 로 Customers 조회 |
| POST | /customers | Customers 생성 |
| PUT | /customers/:id | id로 Customers 수정 |
| DELETE | /customers/:id | id로 Customers 삭제 |
| DELETE | /customers | 모든 Customer 삭제 |
5. Postman을 사용해서 Restful API 테스트
프로젝트 디렉토리 구조는 다음과 같다.

개발 환경
- 운영체제: macOS BigSur
- 개발 도구: Visual Studio Code
- 프레임워크: Node.js + Express
- 데이터베이스: MySQL (+ mysql workbench)
- 테스트 도구: postman
📌 Node.js 프로젝트 폴더 생성 및 환경 세팅
터미널에서 폴더를 생성하고 폴더로 이동한다.
$ mkdir nodejs-express-mysql
$ cd nodejs-express-mysql
Node.js 환경 설정을 세팅한다. package.json 파일의 내용을 차례로 입력한다. (entry point에 server.js 입력, 나머지는 상관x)
$ npm init

package name: (nodejs-express-mysql)
version: (1.0.0)
description: Node.js Restful CRUD API with Node.js, Express and MySQL
entry point: (index.js) server.js
test command:
git repository:
keywords: nodejs, express, mysql, restapi
author: noohk329
license: (ISC)

Is this OK? (yes) yesExpress, mysql, body-parser 모듈을 설치한다.
$ npm install express mysql body-parser --save
환경 세팅을 마친 후 package.json 파일은 다음과 같이 생성이 되어있다.
{
  "name": "nodejs-express-mysql",
  "version": "1.0.0",
  "description": "Node.js Restful CRUD API with Node.js, Express and MySQL",
  "main": "server.js",
  "scripts": {
    "test": "echo \"Error: no test specified\" && exit 1"
  },
  "keywords": [
    "nodejs",
    "express",
    "mysql",
    "restapi"
  ],
  "author": "noohk329",
  "license": "ISC",
  "dependencies": {
    "body-parser": "^1.19.0",
    "express": "^4.17.1",
    "mysql": "^2.18.1"
  }
}
📌 Express 웹 서버 세팅
root floder 에 server.js 파일을 생성하고 다음과 같이 작성한다.
const express = require("express");
const bodyParser = require("body-parser");

const app = express();

app.use(bodyParser.json());
app.use(bodyParser.urlencoded({extended: true}));

app.get("/", (req, res)=>{
    res.json({message: "Hello World!"});
});

// 포트넘버 설정
app.listen(3000, ()=>{
    console.log("Server is running on port 3000.");
})
- Express, bodyParser 모듈 import. (Express: Restapi 구축을 위한 프레임워크 / Body-parser: request를 분석하고, routes에 엑세스 해야 하는 req.body 개체를 만들기 위해 사용)
- express app을 만든다음 app.use()를 사용해서 body-parser 미들웨어 추가
- 테스트 하기 쉽게 간단한 get 경로 정의
- 포트 3000에서 request 요청 수신
VS code 터미널에서 다음 명령어를 입력해서 실행한다.
$ node server.js
웹 브라우저에서 http://localhost:3000/ 에 접속하면 정상적으로 실행되는 것을 볼 수 있다.

📌 MySQL 테이블 생성
mysql 에 스키마를 생성한 후 customer 테이블을 생성한다.
CREATE TABLE IF NOT EXISTS `customers` (
  id int(11) NOT NULL PRIMARY KEY AUTO_INCREMENT,
  email varchar(255) NOT NULL,
  name varchar(255) NOT NULL,
  active BOOLEAN DEFAULT false
) ENGINE=InnoDB DEFAULT CHARSET=utf8;
📌 MySQL configuration 작성 및 연동
app/config 폴더를 생성하고 db.config.js 파일을 생성한다. 파일에는 다음과 같이 작성한다. user-계정, password-설정한 비밀번호, DB-스키마
module.exports = {
    HOST: "localhost",
    USER: "root",
    PASSWORD: "123456",
    DB: "new_db"
};
configuration 파일으로 mysql과 연동하는 부분을 작성할 차례!
app/models 폴더 생성 후 db.js 파일을 생성한다.
const mysql = require("mysql");
const dbConfig = require("../config/db.config.js");

// 데이터베이스 connection 객체 생성
const connection = mysql.createConnection({
    host: dbConfig.HOST,
    user: dbConfig.USER,
    password: dbConfig.PASSWORD,
    database: dbConfig.DB
});

// MySQL connection 실행
connection.connect(error=>{
    if(error) throw error;
    console.log("Successfully connected to the database. ");
})

module.exports = connection;
📌 Model 정의
app/model 폴더에 customer.model.js 파일을 생성한다. 이 파일에는 고객 객체에 대한 생성자를 정의하고, 데이터베이스 연결을 사영해서 CRUD 기능을 작성할 것임.
작성할 CURD Function:
- 새 고객 튜플 생성
- id로 고객 테이블 조회
- 전체 테이블 조회
- id로 고객 데이터 업데이트
- id로 고객 데이터 삭제
- 전체 고객 데이터 삭제
customer.model.js 에 작성할 내용은 다음과 같다.
const sql = require("./db.js");

// 생성자
const Customer = function(customer){
    this.email = customer.email;
    this.name = customer.name;
    this.active = customer.active;
};

// customer 튜플 추가
Customer.create = (newCustomer, result)=>{
    sql.query("INSERT INTO customers SET ?", newCustomer, (err, res)=>{
        if(err){
            console.log("error: ", err);
            result(err, null);
            return;
        }

        console.log("Created customer: ",{id:res.inseertId, ...newCustomer });
        result(null, {id: res.inseertId, ...newCustomer});
    });
};

// customer id로 조회
Customer.findByID = (customerID, result)=>{
    sql.query('SELECT * FROM customers WHERE id = ?',customerID, (err, res)=>{
        if(err){
            console.log("error: ", err);
            result(err, null);
            return;
        }

        if(res.length){
            console.log("found customer: ", res[0]);
            result(null, res[0]);
            return;
        }

        // 결과가 없을 시
        result({kind: "not_found"}, null);
    });
};

// customer 전체 조회
Customer.getAll = result =>{
    sql.query('SELECT * FROM customers', (err, res)=>{
        if(err){
            console.log("error: ", err);
            result(err, null);
            return;
        }

        console.log("customer: ", res);
        result(null, res);
    });
};

// customer id로 수정
Customer.updateByID = (id, customer, result)=>{
    sql.query('UPDATE customers SET email = ?, name = ?, active = ? WHERE id = ?',
    [customer.email, customer.name, customer.active, id], (err, res)=>{
        if(err){
            console.log("error: ", err);
            result(err, null);
            return;
        }

        if(res.affectedRows ==0){
            // id 결과가 없을 시
            result({kind: "not_found"}, null);
            return;
        }

        console.log("update customer: ", {id:id, ... customer});
        result(null, {id:id, ...customer});
    });
};

// customer id로 삭제
Customer.remove = (id, result)=>{
    sql.query('DELETE FROM customers WHERE id = ?',id, (err, res)=>{
        if(err){
            console.log("error: ", err);
            result(err, null);
            return;
        }

        if(res.affectedRows ==0){
            // id 결과가 없을 시
            result({kind: "not_found"}, null);
            return;
        }

        console.log("deleted customer with id: ", id);
        result(null, res);
    });
};

// customer 전체 삭제
Customer.removeAll = result =>{
    sql.query('DELETE FROM customers',(err, res)=>{
        if(err){
            console.log("error: ", err);
            result(err, null);
            return;
        }

        if(res.affectedRows ==0){
            // id 결과가 없을 시
            result({kind: "not_found"}, null);
            return;
        }

        console.log('deleted ${res.affectedRows} customers');
        result(null, res);
    });
};

module.exports = Customer;
📌 Routes 정의
HTTP 요청(GET, POST, PUT, DELETE)을 받았을 때 어떻게 응답할지 route 정의하는 것!
- /customers: GET, POST, DELETE
- /customers/:customerID: GET, PUT, DELETE
app/routes 폴더 생성하고 customer.routes.js 파일을 작성한다.
module.exports = app =>{
    const customers = require("../controllers/customer.controller.js");

    // 튜플 생성
    app.post("/customers", customers.create);

    // 전체 조회
    app.get("/customers", customers.findAll);

    // id로 조회
    app.get("/customers/:customerId", customers.findOne);

    // id로 수정
    app.put("/customers/:customerId", customers.update);

    // id로 삭제
    app.delete("/customers/:customerId", customers.delete);

    // 전체 삭제
    app.delete("/customers", customers.deleteAll);

};
작성한 routes 정의 파일을 server.js에 포함시킨다. (app.listen()바로 앞)
require("./app/routes/customer.routes.js")(app);
📌 Controller 생성
app/controller 폴더를 생성하고 customer.controller.js 파일을 작성한다. 컨트롤레 안에 CRUD function을 구현할 것임.
const Customer = require("../models/customer.model.js");

// 새 객체 생성
exports.create = (req,res)=>{
    if(!req.body){
        res.status(400).send({
            message: "Content can not be empty!"
        });
    };

    const customer = new Customer({
        email: req.body.email,
        name: req.body.name,
        active: req.body.active
    });

    // 데이터베이스에 저장
    Customer.create(customer, (err, data) =>{
        if(err){
            res.status(500).send({
                message:
                err.message || "Some error occured while creating th Customer."
            });
        };
    })
};

// 전체 조회
exports.findAll = (req,res)=>{
    Customer.getAll((err, data) => {
        if (err)
          res.status(500).send({
            message:
              err.message || "Some error occurred while retrieving customers."
          });
        else res.send(data);
      });
};

// id로 조회
exports.findOne = (req,res)=>{
    Customer.findById(req.params.customerId, (err, data) => {
        if (err) {
          if (err.kind === "not_found") {
            res.status(404).send({
              message: `Not found Customer with id ${req.params.customerId}.`
            });
          } else {
            res.status(500).send({
              message: "Error retrieving Customer with id " + req.params.customerId
            });
          }
        } else res.send(data);
      });
};

// id로 갱신
exports.update = (req,res)=>{
    // Validate Request
  if (!req.body) {
    res.status(400).send({
      message: "Content can not be empty!"
    });
  }

  Customer.updateById(
    req.params.customerId,
    new Customer(req.body),
    (err, data) => {
      if (err) {
        if (err.kind === "not_found") {
          res.status(404).send({
            message: `Not found Customer with id ${req.params.customerId}.`
          });
        } else {
          res.status(500).send({
            message: "Error updating Customer with id " + req.params.customerId
          });
        }
      } else res.send(data);
    }
  );
};

// id로 삭제
exports.delete = (req,res)=>{
    Customer.remove(req.params.customerId, (err, data) => {
        if (err) {
          if (err.kind === "not_found") {
            res.status(404).send({
              message: `Not found Customer with id ${req.params.customerId}.`
            });
          } else {
            res.status(500).send({
              message: "Could not delete Customer with id " + req.params.customerId
            });
          }
        } else res.send({ message: `Customer was deleted successfully!` });
      });
};

// 전체 삭제
exports.deleteAll = (req,res)=>{
    Customer.removeAll((err, data) => {
        if (err)
          res.status(500).send({
            message:
              err.message || "Some error occurred while removing all customers."
          });
        else res.send({ message: `All Customers were deleted successfully!` });
      });
};
📌 API 테스트 (with postman)
VS code 터미널에서 다음 명령어를 입력해서 실행한다.
$ node server.js콘솔에 다음과 같이 결과가 나온다.
Server is running on port 3000.
Successfully connected to the database.
이제 Postman 을 사용해서 작성한 API method를 테스트할 차례!
Workspace에서 create request 를 선택하면 테스트할 수 있는 윈도우가 나온다. 메서드 타입 선택하고 request를 입력하면 간단히 API request를 테스트 할 수 있다! Body에 데이터를 입력하면 해당 사항이 전달된다.
1️⃣ POST /customers 로 새 튜플 생성
Body에 추가할 튜플의 정보를 json 타입으로 작성하고 send를 보낸다.

mysql 데이터베이스에 잘 반영이 된 것을 확인할 수 있다.
mysql> select * from new_db.customers;
+----+----------------+------+--------+
| id | email          | name | active |
+----+----------------+------+--------+
|  1 | abc@gmail.com  | Lee  |      1 |
|  2 | shin@gmail.com | Shin |      0 |
|  3 | kim@gmail.com  | Kim  |      1 |
|  4 | beak@gmail.com | Beak |      0 |
|  5 | lim@gmail.com  | Lim  |      0 |
+----+----------------+------+--------+
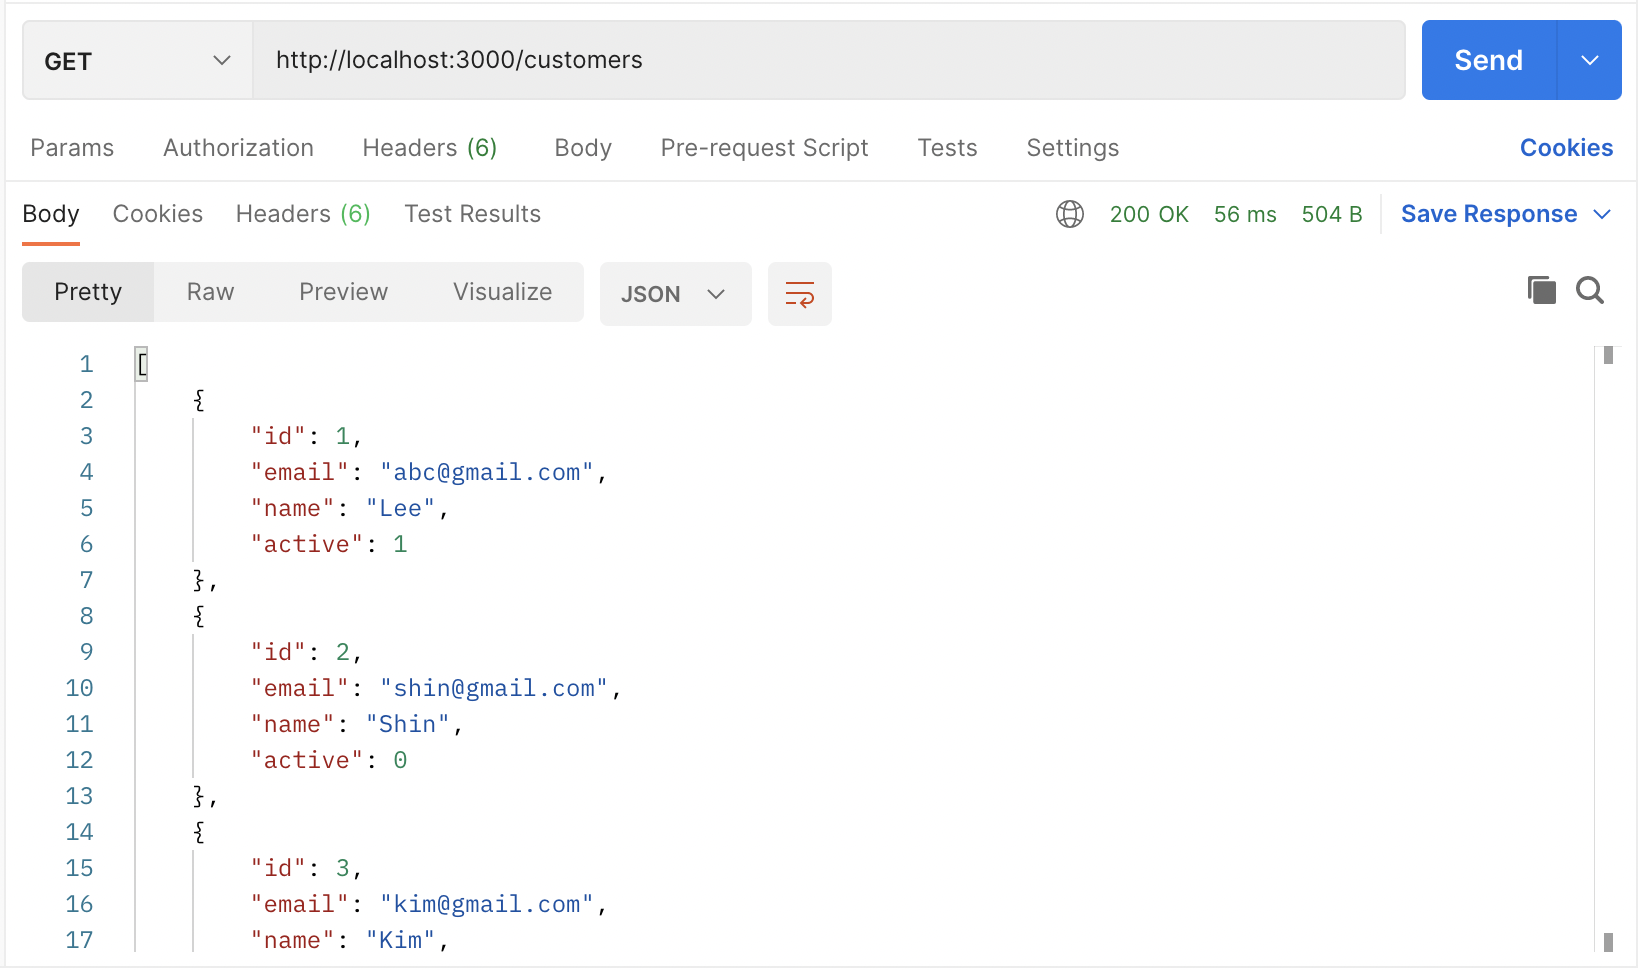
2️⃣ GET /customers 로 전체 칼럼 조회

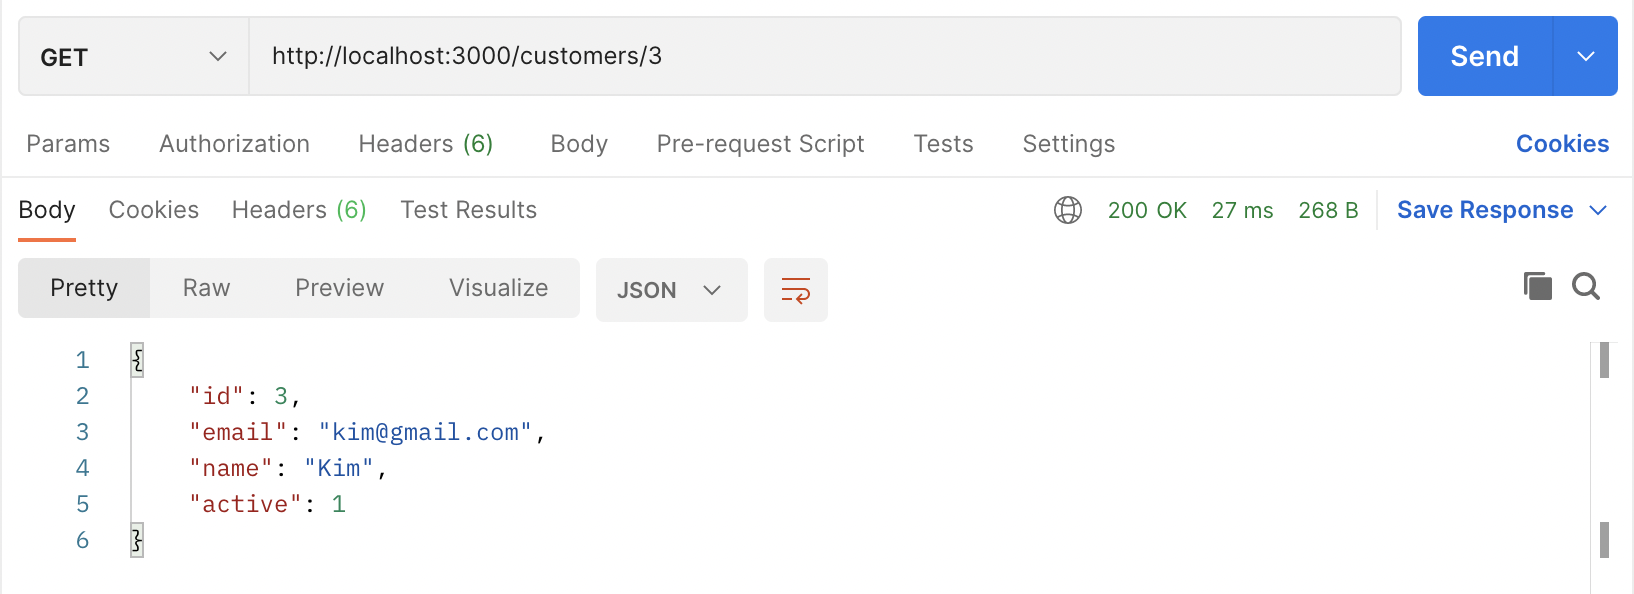
3️⃣GET /customers/:id 로 id로 칼럼 조회

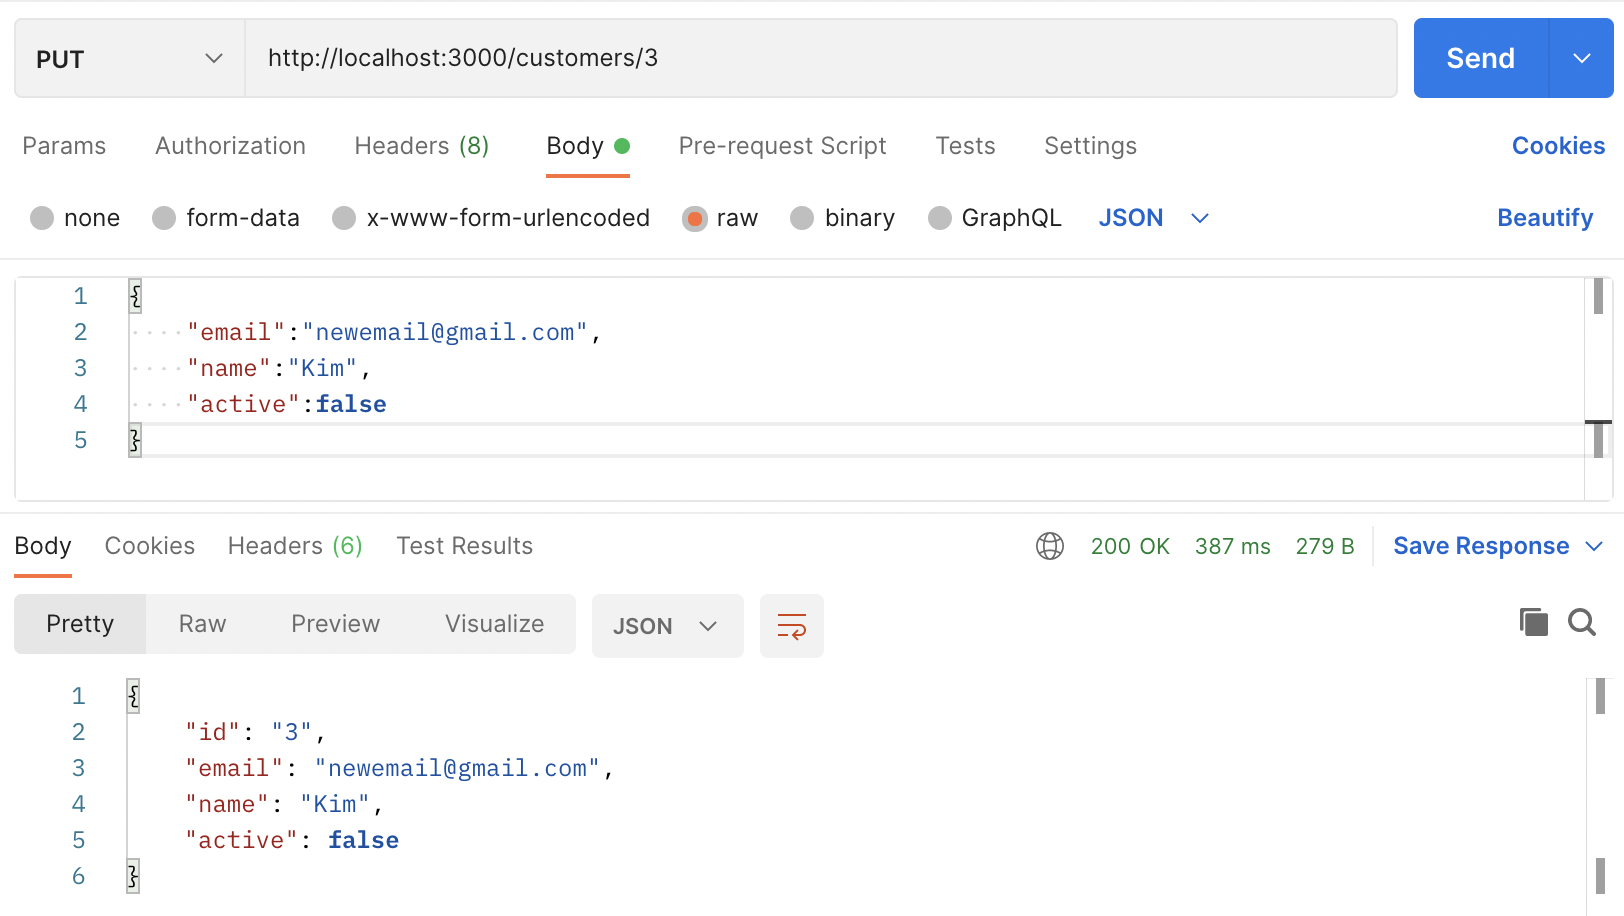
4️⃣PUT /customers/:id 로 id로 칼럼 수정

수정된 내용(id=3)이 잘 반영된 것을 확인할 수 있다.
mysql> select * from new_db.customers;
+----+--------------------+------+--------+
| id | email              | name | active |
+----+--------------------+------+--------+
|  1 | abc@gmail.com      | Lee  |      1 |
|  2 | shin@gmail.com     | Shin |      0 |
|  3 | newemail@gmail.com | Kim  |      0 |
|  4 | beak@gmail.com     | Beak |      0 |
|  5 | lim@gmail.com      | Lim  |      0 |
+----+--------------------+------+--------+
5️⃣DELETE /customers/:id 로 id로 칼럼 삭제

mysql 서버에서 id=5인 칼럼이 삭제된 것을 확인할 수 있다.
mysql> select * from new_db.customers;
+----+--------------------+------+--------+
| id | email              | name | active |
+----+--------------------+------+--------+
|  1 | abc@gmail.com      | Lee  |      1 |
|  2 | shin@gmail.com     | Shin |      0 |
|  3 | newemail@gmail.com | Kim  |      0 |
|  4 | beak@gmail.com     | Beak |      0 |
+----+--------------------+------+--------+
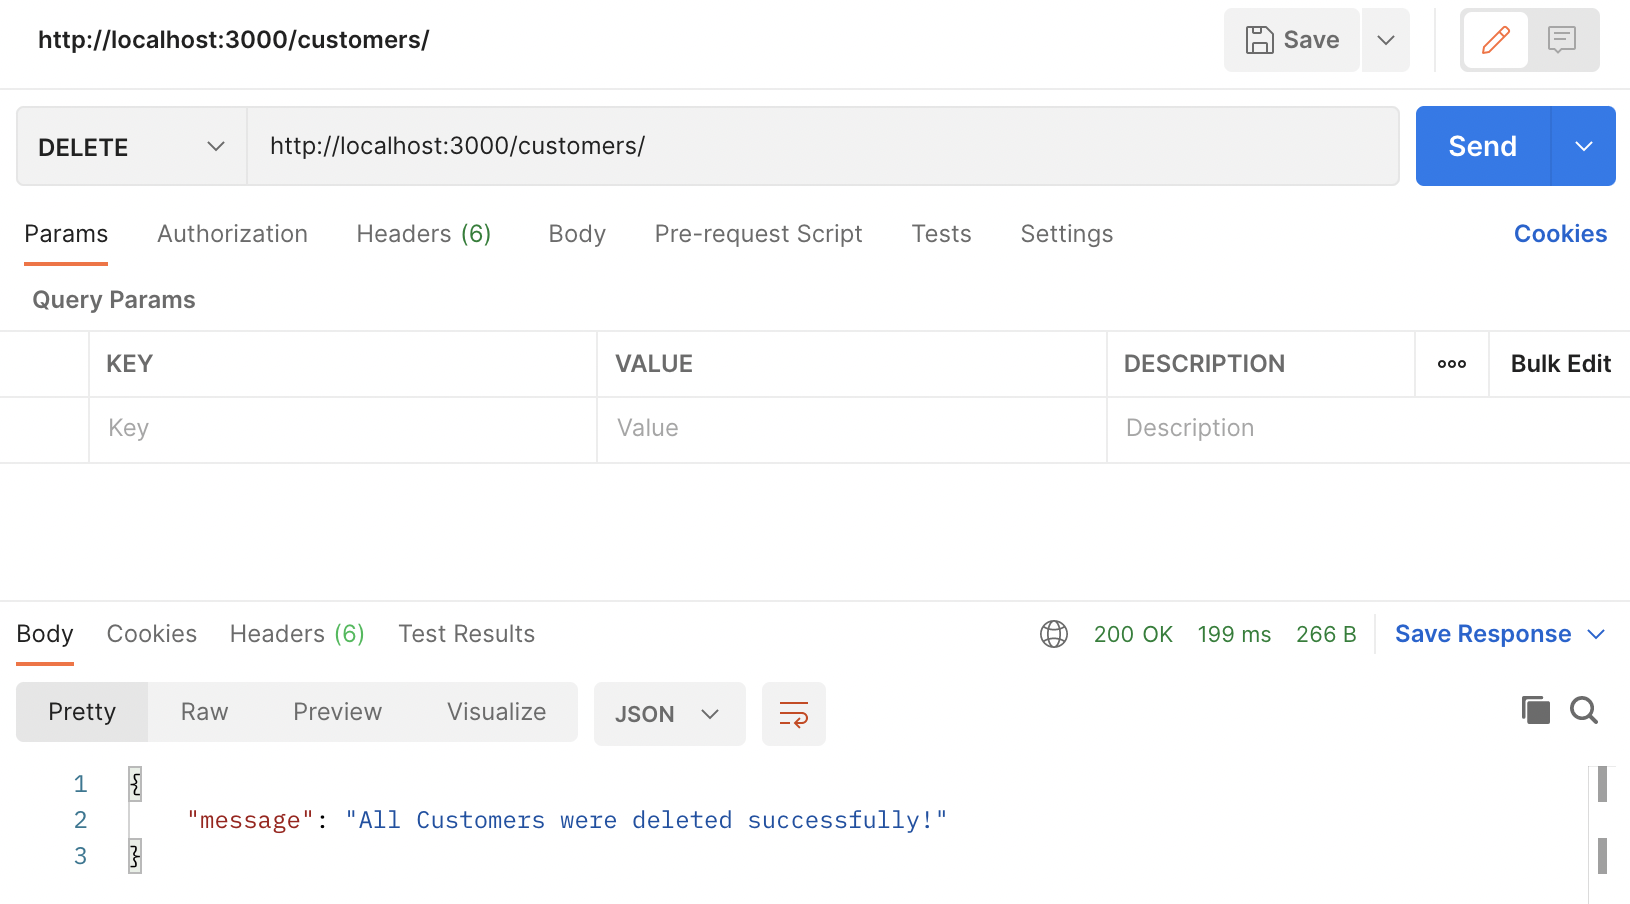
6️⃣DELETE /customers 로 전체 삭제

전체 데이터가 삭제된 것을 확인할 수 있다.
mysql> select * from new_db.customers;
Empty set (0.13 sec)
🤖 마무리
이전에 express와 mysql을 사용해서 서버 구축했을 때는 app.js 에 경로 등을 다 한꺼번에 작성했다. (보통 간단하게 기능을 구축하면 이 방법을 더 많이 사용하는 것 같다.) 이번에는 routes, model, controller를 나눠서 구축해봤는데 좀 더 세부적이고 해비한 서버를 구축하게 되면 이 코드를 가이드라인으로 구축하면 훨씬 수월할 것 같다.
🔹Git Repository
https://github.com/noohk329/nodejs-express-mysql
noohk329/nodejs-express-mysql
Node.js의 Express 프레임워크 사용하여 Mysql 연동한 Restful API 구축 - noohk329/nodejs-express-mysql
github.com
🔹참고 자료
https://www.bezkoder.com/node-js-rest-api-express-mysql/
Build Node.js Rest APIs with Express & MySQL - BezKoder
Build a Rest CRUD API for a simple application using Node. js, Express and MySQL.
www.bezkoder.com

